
5.2. Collaborative Workflow
In this module, you’ll be introduced to a good, open, welcome workflow for collaboration on GitHub. You’ll get some tips for good GitHub communications, and you’ll practice making and managing changes to repositories… You’ll play the role of both Project Lead and contributor. Get ready to make and merge your first pull requests!
Format
Read, watch videos, and work with GitHub in two roles: as a contributor, and as a project lead
Prerequisites
Have completed all previous sections and modules
Materials
Your computer, GitHub account, your own project— plus someone else’s project you’ll contribute to!
- Collaboration as Conversation
- Writing Great Messages and Comments on GitHub
- Assignment: As a Contributor, Make a Pull Request
- Assignment: As Project Lead, Merge a Pull Request
Collaboration as Conversation
Good collaboration is a back and forth process, like a conversation, or a call and response. It’s not complicated, but you need to know the steps and the roles for contributor and lead. The series of videos below walks you through a workflow for collaboration on open projects, and demonstrates good communication with contributors. Watch closely, because you’ll be doing these steps (and playing both roles) yourself in the assignments at the end of this module! We’ve included screenshots in the assignment section to help you along.
If you master this workflow and practice it in your community, contribution can happen more smoothly and be more satisfying for all involved. You, the project lead, need to move this whole process forward! These handy tips should help.
- Acknowledge when a new issue is posted by a contributor (remember, both contributors and project leads can post issues!)
- Notify users when you start and finish work
- Summarize the state of the issue
- Give periodic status updates
- Inform everyone if you slip
- Inform everyone if you’re on track
- Make responsibility handoffs clear
- Notify when new functionality is added to the project, and when fixes are made
- Always use friendly tone and correct grammar to increase legibility
- Talk to users on their terms, follow their cues
Writing Great Messages and Comments on GitHub
Your communications on GitHub don’t need to be literary masterpieces, but it’s really helpful if they are clear and well-written. Remember the history of your document is a timeline of commits. Each “commit message” is the backstory of your changes. A good, comprehensible, useful “commit message” is one that fills in that story. It lets collaborators and the project owner/lead know what you’ve done, what changes you’ve made, what you’ve added. This includes your own commits as project lead. While you might know the ins and outs of any change you made at the moment, in 5 days or 5 weeks or 5 years, those details will probably have slipped your mind. A detailed commit will capture that information forever.
When you’re writing commit messages, you’ll want to make them short, clear, and in a fairly uniform format so they’re easy to read. Here are a few rules for writing messages like these, taken from this excellent blog post, How to Write a Git Commit Message, by Chris Beams. Read the post to learn about the rationale behind each rule.
- Separate subject from body with a blank line
- Limit the subject line to 50 characters
- Capitalize the subject line
- Do not end the subject line with a period
- Use the imperative mood in the subject line
- Wrap the body at 72 characters
- Use the body to explain what and why vs. how
Here is an example to illustrate the above points:
Add example commit message to collab workflow lesson

An example of what a nice commit message looks like to make the points from
the lesson text more concrete.
Assignment: As a Contributor, Make a Pull Request
- Find a project you’d like to contribute to and check out the README
- Read the contributing.md file and code of conduct
- Familiarize yourself with the project’s roadmap
- Review the issues and pick one– ideally a “good first bug” that you can take on
- Comment on the issue, be sure to ask if you have any questions about the task
- Follow the contributor guidelines
- Fork the repo
- Make a branch
- Make a commit
- Write a great commit message
- Make a pull request!
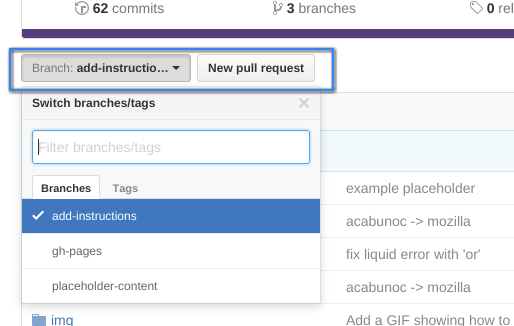
Switch to your branch containing the changes
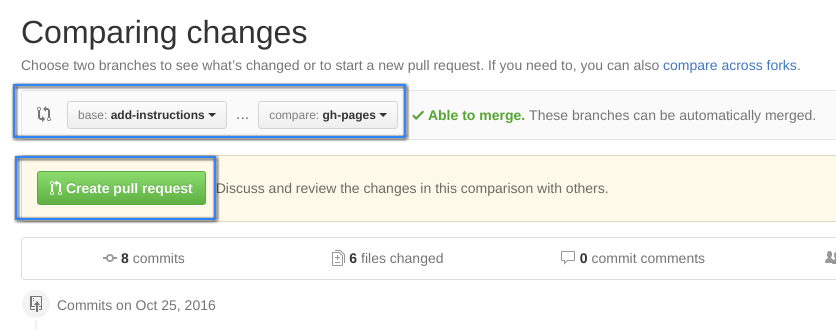
Compare your changes with the remote branch
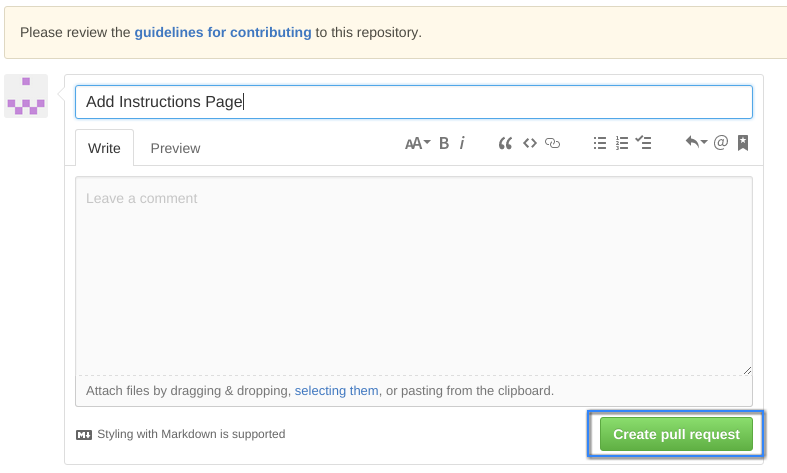
Provide a title and a description for your pull request
Assignment: As Project Lead, Merge a Pull Request
Follow the steps described for as project lead
- Make a label
- Make an issue for a good first bug
- Let your community know about this issue!
- Reply to Comment
- Wait for Pull request
- Review pull request, and be sure to provide useful feedback and encouragement
- Merge pull request
- Thank your contributor!
- Close the issue! Woo-Hoo!